// this sketch turns the Arduino into a AVRISP
// using the following pins:
// 10: slave reset
// 11: MOSI
// 12: MISO
// 13: SCK// Put an LED (with resistor) on the following pins:
// 9: Heartbeat – shows the programmer is running
// 8: Error – Lights up if something goes wrong (use red if that makes sense)
// 7: Programming – In communication with the slave
//
// October 2010 by Randall Bohn
// – Write to EEPROM > 256 bytes
// – Better use of LEDs:
// — Flash LED_PMODE on each flash commit
// — Flash LED_PMODE while writing EEPROM (both give visual feedback of writing progress)
// – Light LED_ERR whenever we hit a STK_NOSYNC. Turn it off when back in sync.
//
// October 2009 by David A. Mellis
// – Added support for the read signature command
//
// February 2009 by Randall Bohn
// – Added support for writing to EEPROM (what took so long?)
// Windows users should consider WinAVR's avrdude instead of the
// avrdude included with Arduino software.
//
// January 2008 by Randall Bohn
// – Thanks to Amplificar for helping me with the STK500 protocol
// – The AVRISP/STK500 (mk I) protocol is used in the arduino bootloader
// – The SPI functions herein were developed for the AVR910_ARD programmer
// – More information at http://code.google.com/p/mega-isp
#include "pins_arduino.h" // defines SS,MOSI,MISO,SCK
#define SCK 13
#define MISO 12
#define MOSI 11
#define RESET 10
#define LED_HB 9
#define LED_ERR 8
#define LED_PMODE 7
#define PROG_FLICKER true
#define HWVER 2
#define SWMAJ 1
#define SWMIN 18// STK Definitions
#define STK_OK 0x10
#define STK_FAILED 0x11
#define STK_UNKNOWN 0x12
#define STK_INSYNC 0x14
#define STK_NOSYNC 0x15
#define CRC_EOP 0x20 //ok it is a space…
void pulse(int pin, int times);
void setup() {
Serial.begin(19200);
pinMode(LED_PMODE, OUTPUT);
pulse(LED_PMODE, 2);
pinMode(LED_ERR, OUTPUT);
pulse(LED_ERR, 2);
pinMode(LED_HB, OUTPUT);
pulse(LED_HB, 2);
}
int error=0;
int pmode=0;
// address for reading and writing, set by 'U' command
int here;
uint8_t buff[256]; // global block storage
#define beget16(addr) (*addr * 256 + *(addr+1) )
typedef struct param {
uint8_t devicecode;
uint8_t revision;
uint8_t progtype;
uint8_t parmode;
uint8_t polling;
uint8_t selftimed;
uint8_t lockbytes;
uint8_t fusebytes;
int flashpoll;
int eeprompoll;
int pagesize;
int eepromsize;
int flashsize;
}parameter;
parameter param;// this provides a heartbeat on pin 9, so you can tell the software is running.
uint8_t hbval=128;
int8_t hbdelta=8;
void heartbeat() {
if (hbval > 192) hbdelta = -hbdelta;
if (hbval < 32) hbdelta = -hbdelta;
hbval += hbdelta;
analogWrite(LED_HB, hbval);
delay(40);
}
void loop(void) {
// is pmode active?
if (pmode) digitalWrite(LED_PMODE, HIGH);
else digitalWrite(LED_PMODE, LOW);
// is there an error?
if (error) digitalWrite(LED_ERR, HIGH);
else digitalWrite(LED_ERR, LOW);// light the heartbeat LED
heartbeat();
if (Serial.available()) {
avrisp();
}
}
uint8_t getch() {
while(!Serial.available());
return Serial.read();
}
void fill(int n) {
for (int x = 0; x < n; x++) {
buff[x] = getch();
}
}
#define PTIME 30
void pulse(int pin, int times) {
do {
digitalWrite(pin, HIGH);
delay(PTIME);
digitalWrite(pin, LOW);
delay(PTIME);
}while (times--);
}
void prog_lamp(int state) {
if(PROG_FLICKER)
digitalWrite(LED_PMODE, state);
}
void spi_init() {
uint8_t x;
SPCR = 0x53;
x=SPSR;
x=SPDR;
}
void spi_wait() {
do {
}
while (!(SPSR & (1 << SPIF)));
}uint8_t spi_send(uint8_t b) {
uint8_t reply;
SPDR=b;
spi_wait();
reply = SPDR;
return reply;
}
uint8_t spi_transaction(uint8_t a, uint8_t b, uint8_t c, uint8_t d) {
uint8_t n;
spi_send(a);
n=spi_send(b);
//if (n != a) error = -1;
n=spi_send(c);
return spi_send(d);
}
void empty_reply() {
if (CRC_EOP == getch()) {
Serial.print((char)STK_INSYNC);
Serial.print((char)STK_OK);
} else {
error++;
Serial.print((char)STK_NOSYNC);
}
}
void breply(uint8_t b) {
if (CRC_EOP == getch()) {
Serial.print((char)STK_INSYNC);
Serial.print((char)b);
Serial.print((char)STK_OK);
}
else {
error++;
Serial.print((char)STK_NOSYNC);
}
}
void get_version(uint8_t c) {
switch(c) {
case 0x80:
breply(HWVER);
break;
case 0x81:
breply(SWMAJ);
break;
case 0x82:
breply(SWMIN);
break;
case 0x93:
breply('S'); // serial programmer
break;
default:
breply(0);
}
}
void set_parameters() {
// call this after reading paramter packet into buff[]
param.devicecode = buff[0];
param.revision = buff[1];
param.progtype = buff[2];
param.parmode = buff[3];
param.polling = buff[4];
param.selftimed = buff[5];
param.lockbytes = buff[6];
param.fusebytes = buff[7];
param.flashpoll = buff[8];
// ignore buff[9] (= buff[8])
// following are 16 bits (big endian)
param.eeprompoll = beget16(&buff[10]);
param.pagesize = beget16(&buff[12]);
param.eepromsize = beget16(&buff[14]);
// 32 bits flashsize (big endian)
param.flashsize = buff[16] * 0x01000000
+ buff[17] * 0x00010000
+ buff[18] * 0x00000100
+ buff[19];
}
void start_pmode() {
spi_init();
// following delays may not work on all targets…
pinMode(RESET, OUTPUT);
digitalWrite(RESET, HIGH);
pinMode(SCK, OUTPUT);
digitalWrite(SCK, LOW);
delay(50);
digitalWrite(RESET, LOW);
delay(50);
pinMode(MISO, INPUT);
pinMode(MOSI, OUTPUT);
spi_transaction(0xAC, 0x53, 0x00, 0x00);
pmode = 1;
}
void end_pmode() {
pinMode(MISO, INPUT);
pinMode(MOSI, INPUT);
pinMode(SCK, INPUT);
pinMode(RESET, INPUT);
pmode = 0;
}
void universal() {
int w;
uint8_t ch;
fill(4);
ch = spi_transaction(buff[0], buff[1], buff[2], buff[3]);
breply(ch);
}
void flash(uint8_t hilo, int addr, uint8_t data) {
spi_transaction(0x40+8*hilo,
addr>>8 & 0xFF,
addr & 0xFF,
data);
}
void commit(int addr) {
if (PROG_FLICKER) prog_lamp(LOW);
spi_transaction(0x4C, (addr >> 8) & 0xFF, addr & 0xFF, 0);
if (PROG_FLICKER) {
delay(PTIME);
prog_lamp(HIGH);
}
}
//#define _current_page(x) (here & 0xFFFFE0)
int current_page(int addr) {
if (param.pagesize == 32) return here & 0xFFFFFFF0;
if (param.pagesize == 64) return here & 0xFFFFFFE0;
if (param.pagesize == 128) return here & 0xFFFFFFC0;
if (param.pagesize == 256) return here & 0xFFFFFF80;
return here;
}
void write_flash(int length) {
fill(length);
if (CRC_EOP == getch()) {
Serial.print((char) STK_INSYNC);
Serial.print((char) write_flash_pages(length));
} else {
error++;
Serial.print((char) STK_NOSYNC);
}
}
uint8_t write_flash_pages(int length) {
int x = 0;
int page = current_page(here);
while (x < length) {
if (page != current_page(here)) {
commit(page);
page = current_page(here);
}
flash(LOW, here, buff[x++]);
flash(HIGH, here, buff[x++]);
here++;
}
commit(page);
return STK_OK;
}
#define EECHUNK (32)
uint8_t write_eeprom(int length) {
// here is a word address, get the byte address
int start = here * 2;
int remaining = length;
if (length > param.eepromsize) {
error++;
return STK_FAILED;
}
while (remaining > EECHUNK) {
write_eeprom_chunk(start, EECHUNK);
start += EECHUNK;
remaining -= EECHUNK;
}
write_eeprom_chunk(start, remaining);
return STK_OK;
}
// write (length) bytes, (start) is a byte address
uint8_t write_eeprom_chunk(int start, int length) {
// this writes byte-by-byte,
// page writing may be faster (4 bytes at a time)
fill(length);
prog_lamp(LOW);
for (int x = 0; x < length; x++) {
int addr = start+x;
spi_transaction(0xC0, (addr>>8) & 0xFF, addr & 0xFF, buff[x]);
delay(45);
}
prog_lamp(HIGH);
return STK_OK;
}
void program_page() {
char result = (char) STK_FAILED;
int length = 256 * getch() + getch();
char memtype = getch();
// flash memory @here, (length) bytes
if (memtype == 'F') {
write_flash(length);
return;
}
if (memtype == 'E') {
result = (char)write_eeprom(length);
if (CRC_EOP == getch()) {
Serial.print((char) STK_INSYNC);
Serial.print(result);
} else {
error++;
Serial.print((char) STK_NOSYNC);
}
return;
}
Serial.print((char)STK_FAILED);
return;
}
uint8_t flash_read(uint8_t hilo, int addr) {
return spi_transaction(0x20 + hilo * 8,
(addr >> 8) & 0xFF,
addr & 0xFF,
0);
}
char flash_read_page(int length) {
for (int x = 0; x < length; x+=2) {
uint8_t low = flash_read(LOW, here);
Serial.print((char) low);
uint8_t high = flash_read(HIGH, here);
Serial.print((char) high);
here++;
}
return STK_OK;
}
char eeprom_read_page(int length) {
// here again we have a word address
int start = here * 2;
for (int x = 0; x < length; x++) {
int addr = start + x;
uint8_t ee = spi_transaction(0xA0, (addr >> 8) & 0xFF, addr & 0xFF, 0xFF);
Serial.print((char) ee);
}
return STK_OK;
}
void read_page() {
char result = (char)STK_FAILED;
int length = 256 * getch() + getch();
char memtype = getch();
if (CRC_EOP != getch()) {
error++;
Serial.print((char) STK_NOSYNC);
return;
}
Serial.print((char) STK_INSYNC);
if (memtype == 'F') result = flash_read_page(length);
if (memtype == 'E') result = eeprom_read_page(length);
Serial.print(result);
return;
}
void read_signature() {
if (CRC_EOP != getch()) {
error++;
Serial.print((char) STK_NOSYNC);
return;
}
Serial.print((char) STK_INSYNC);
uint8_t high = spi_transaction(0x30, 0x00, 0x00, 0x00);
Serial.print((char) high);
uint8_t middle = spi_transaction(0x30, 0x00, 0x01, 0x00);
Serial.print((char) middle);
uint8_t low = spi_transaction(0x30, 0x00, 0x02, 0x00);
Serial.print((char) low);
Serial.print((char) STK_OK);
}
////////////////////////////////////'
////////////////////////////////////
int avrisp() {
uint8_t data, low, high;
uint8_t ch = getch();
switch (ch) {
case '0': // signon
error = 0;
empty_reply();
break;
case '1':
if (getch() == CRC_EOP) {
Serial.print((char) STK_INSYNC);
Serial.print("AVR ISP");
Serial.print((char) STK_OK);
}
break;
case 'A':
get_version(getch());
break;
case 'B':
fill(20);
set_parameters();
empty_reply();
break;
case 'E': // extended parameters – ignore for now
fill(5);
empty_reply();
break;
case 'P':
start_pmode();
empty_reply();
break;
case 'U': // set address (word)
here = getch() + 256 * getch();
empty_reply();
break;
case 0x60: //STK_PROG_FLASH
low = getch();
high = getch();
empty_reply();
break;
case 0x61: //STK_PROG_DATA
data = getch();
empty_reply();
break;
case 0x64: //STK_PROG_PAGE
program_page();
break;
case 0x74: //STK_READ_PAGE 't'
read_page();
break;
case 'V': //0x56
universal();
break;
case 'Q': //0x51
error=0;
end_pmode();
empty_reply();
break;
case 0x75: //STK_READ_SIGN 'u'
read_signature();
break;
// expecting a command, not CRC_EOP
// this is how we can get back in sync
case CRC_EOP:
error++;
Serial.print((char) STK_NOSYNC);
break;
// anything else we will return STK_UNKNOWN
default:
error++;
if (CRC_EOP == getch())
Serial.print((char)STK_UNKNOWN);
else
Serial.print((char)STK_NOSYNC);
}
}
3 Jun 2013
Siri-like Raspberry Pi Voice Regnition Control System For Home Automation
This is a project on Siri-like voice recognition using Raspberry Pi, it's useful for home automation control system. I use three components for the project, code is mainly scrapped out from various Internet sources
- A speech-to-text component that will do the voice recognition
- Some “brains” to analyze the so captured text
- A text to speech component that will speak out the result from component 2
The hardware required is a Raspberry Pi with Internet connectivity and a USB microphone. Pi is running the 2012-12-16-wheezy-raspbian image; I don’t have a USB microphone, but I have a USB webcam (Logitech V-UAV35) with in-built microphone, so that worked out fine without any driver installation.
This is a post explaining this project in detail: Raspberry Pi Voice Recognition Works Like Siri
This is a post explaining this project in detail: Raspberry Pi Voice Recognition Works Like Siri
Speech recognition for Raspberry Pi can be done in number of ways, but I thought the most elegant would be to use Google’s voice recognition functions. I used this bash script to get that part done (source):
#!/bin/bash
arecord -D "plughw:1,0" -q -f cd -t wav | ffmpeg -loglevel panic -y -i - -ar 16000 -acodec flac file.flac  > /dev/null 2>&1
wget -q -U "Mozilla/5.0" --post-file file.flac --header "Content-Type: audio/x-flac; rate=16000" -O - "http://www.google.com/speech-api/v1/recognize?lang=en-us&client=chromium" | cut -d\" -f12  >stt.txt
cat stt.txt
rm file.flac  > /dev/null 2>&1
..and then set it to executable:
chmod +x stt.sh
You may need to install ffmpeg
sudo apt-get install ffmpeg
So what this does is to record to a flac file from the USB microphone until you press Ctrl+C and then passes that file to Google for analysis, which in turn returns the recognized text. Lets give it a try:
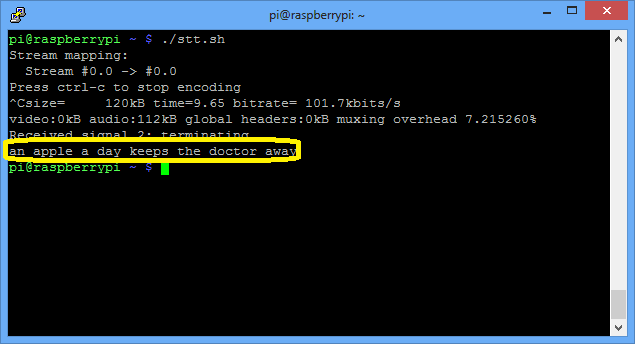
It work pretty good even with my bad accent. The output is saved to stt.txt file.
Now onto the “brains” section, this is with no doubt a task for Wolfram Aplha. I used Python to interface with it, there is already a library to use. It is pretty easy to install, just follow the instructions in the link. I had to get an API key, which is a 2 minute task and gives you 2000 queries a month.
#!/usr/bin/python
import wolframalpha
import sys
#Get a free API key here http://products.wolframalpha.com/api/
#I may disable this key if I see lots of abuse
app_id='Q59EW4-7K8AHE858R'

client = wolframalpha.Client(app_id)

query = ' '.join(sys.argv[1:])
res = client.query(query)

if len(res.pods) > 0:
    texts = ""
    pod = res.pods[1]
    if pod.text:
        texts = pod.text
    else:
        texts = "I have no answer for that"
    print texts
else:
    print "I am not sure"
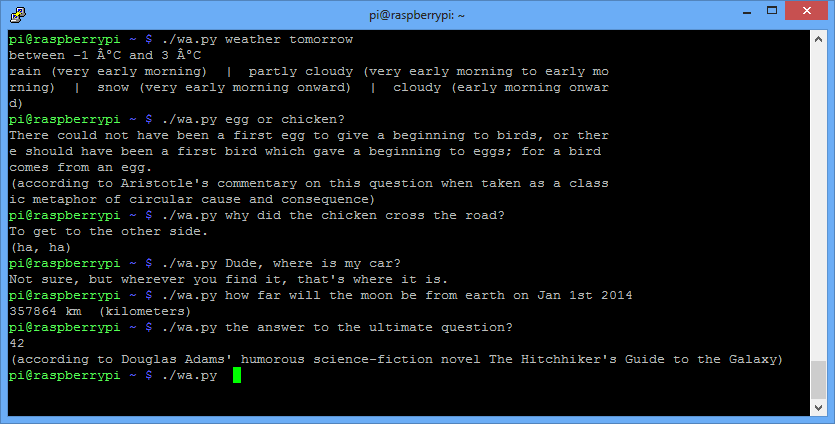
.. and lets try it out with the questions that keep me up at night:
yep, brains are there. Now to the last part: speaking that answer out. Sure enough, we use Google’s speech services again (source)
#!/bin/bash
say() { local IFS=+;/usr/bin/mplayer -ao alsa -really-quiet -noconsolecontrols "http://translate.google.com/translate_tts?tl=en&q=$*"; }
say $*
..you may need to “sudo apt-get install mplayer” first..
It sounds pretty cool indeed.
So finally a small script to put these to work together:
#!/bin/bash
echo Please speak now and press Ctrl+C when done
./stt.sh
./tts.sh $(./wa.py $(cat stt.txt))
So overall a fun project, maybe with some potential to use in home automation.. (4627)
2 Jun 2013
How to use Git and Gibhub on Raspberry Pi
How to use Git and GitHub on Raspberry Pi
Git is a free and open source distributed version control system. Let’s take that apart bit by bit.
Git is free and open source. You don’t need to pay to use it, and the source code is freely available. In practice that means that many pairs of eyes will be scanning the code and reading any bug reports, so defects in the code are likely to be found and fixed quickly.
But what does git do?
The fact that it’s a version control system means that it can help you keep track of files that are frequently changed. Most version control systems maintain a history of changes and make it easy for users to compare versions, to load previous versions, and to add new versions as appropriate. Most software developers use a version control system of some sort, and many use git.
Git has a range of features which make it attractive to developers, and one of those features is the fact that it supports distributed development. In other words, git is designed for use by teams in which the developers work in more than one location.
You don’t need to know about we how we use git in our development process. The thing that matters is that you can use git, simply and easily, to get the latest version of our software on your Raspberry Pi.
Git expects developers to keep all the files for a project or library together in something called a repository. That’s just a grand name for a collection of files that belong together. All of our libraries are stored in git repositories, and those repositories are stored on GitHub.
GitHub
Hopefully that’s given you a feel for git and why we use it, but what about GitHub?
GitHub is a web-based service for people who want to use git. It’s widely used by teams who want to make some or all of their work publicly available under an open source license. Since that’s what we do, we feel that GitHub is a natural choice for us to store our code.
If you want to keep up-to-date with the code we’ve published on GitHub, you will need to install and use git.
Installing Git on your Pi
To install git, just pen a terminal window by typing Ctrls-Alt-T and invoke
sudo apt-get install git-core
You’ll be asked for your password and so long as your Pi has access to the internet and the debian RasPi repository is on-line you’ll see some activity which will show what’s going on as git is installed.
Once that stops you’ll be ready to go.
Using git to download our code
When you first install a local copy of a repository using git, you do so by creating what’s called a clone of the repository.
In order to install a local copy of the repository, click on the button marked ‘Git Read-Only’ and copy the text of the URI on its right. In our case, that’s git://github.com/quick2wire/quick2wire-python-api.git
It’s probably best to keep all your GitHub-based repositores in one place, so you may want to create a directory called git within your home directory. (In a command window, type cd ~
and then type mkdir git)
When you have done so, open a command window if necessary, change to your git directory by typing cd ~/git and create a copy of the GitHub content by typing
git clone git://github.com/quick2wire/quick2wire-python-api.git
Git will tell you that it’s created an empty repository and will then pull down all the current files from the repository on GitHub.
The README file on Git should tell you what do do to install the software in the repository. in our case the recommended approach is to add the location of your new cloned repository to your Python Path.
Now you can use the software.
But how do you keep it up to date?
Keeping current
If you take look at the GitHub page for a repository you can see when the files were last changed. If you open an account at GitHub (which has a free account option) you can chose to watch one or more repositories, in which case you will get notified whenever the repsoitory changes.
If a repository you’ve cloned has changed since you last updated it, it’s really easy to get back up-to-date. In a command window, change to the directory in which you cloned the repository. In our case, you’d typecd ~/git/quick2wire-python-api in a command window. Now just type git pull and git will update your repository so that it’s an exact copy of the current version on GitHub.
Depending on the way type of software in the repository, you may or may not need to repeat the installation procedure. If you’ve updated out gpio-admin repository, you’ll need to run through the installation process again, as described in the README for that repository in GitHub. In the case of the quick2wire-python-api package, you’ve already placed the code on your PythonPath so you should be ready to use the updated library without doing anything else.
Summary
You can use most code on GitHub by downloading, unpacking and installing an archive containing the code.
If the code is changing fast, and you want to stay up-to-date you may prefer to install git, use the clone command to create a local copy of the repository, and use the git pull command to refresh your copy when the version on GitHub has changed.
27 Apr 2013
4-legged Robot using Arduino
This is a 4-legged robot built by Oscar, original post can be found here:
This is a screen shot of what he has done so far.

Arduino 4-legged Robot - Stalker
I am going to build an Arduino Quadruped Robot. As usual, I will share my source code and show as many pictures as possible, to help those of you who are also building Quadruped robots. The way I do things might not be the best ways, and I am sure you can come up with better solutions, please let me know if you do! 
15 Mar 2013
How to download Youtube Video 如何下载 Youtube 视频
originally from:
How to download YouTube videos without any software or toolbar- In this video you will learn the best trick ever to download YouTube videos.
Download YouTube video by simply typing in "ss" in the url of the youtube video.
Follow this method to download youtube videos. For you to download youtube videos free to computer from youtube you need to follow the below described procedure.
1. The first step to download video from youtube is to play the video.
2. After playing the youtube video, The second step to download video from youtube is to look for www. and after www. type in "ss" in the url of the youtube video you intended to download on your computer.
3. The third step to download video from youtube is after typing in "ss" in the url now choose a format for your youtube video to download.
4. And last step which comes in the process of "How to download youtube video" is to press enter and choose save as location of the video and you are done.
5. The youtube video you intended to download on your pc for free without any software is downloaded to your computer and in this way you came to know the best way to download video from youtube .
how to download youtube videos to your computer without any software, how to download youtube videos on windows 7, windows xp, windows 8.
如何下载 youtube 视频呢?
1. 在 youtube 上找到你想要下載的視頻。
2. 在地址欄,'youtube.com'的前面加 'ss',按 enter 鍵。
3. 你將會到一個下載網站,在這個網站的右邊,選擇你想要的格式就可以了~
Subscribe to:
Posts (Atom)